| Author | L&L Communication Team |
|---|---|
| Category | Illuminating spaces |
| Read time: | min |
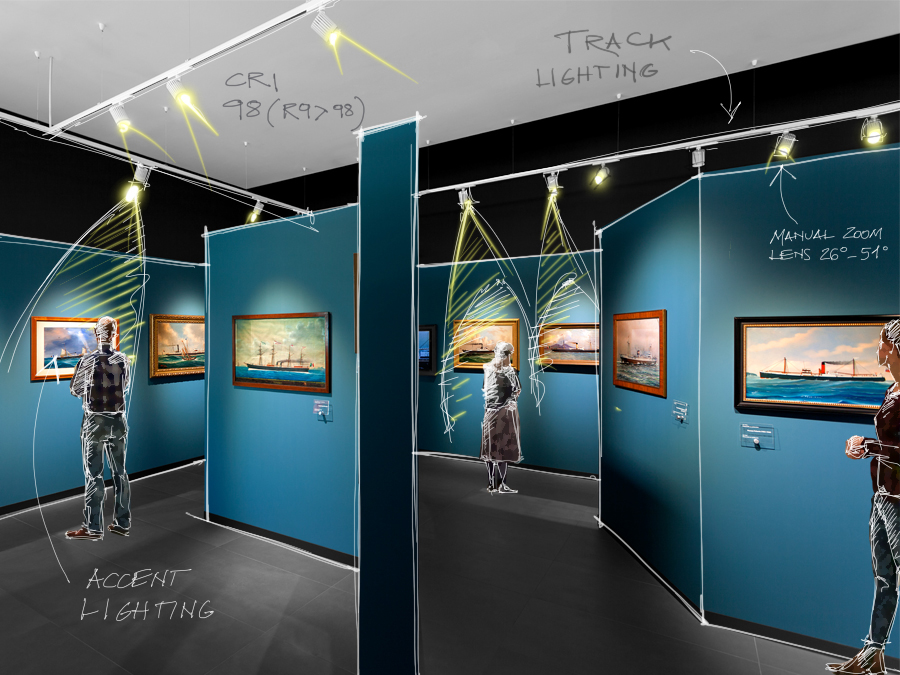
In our article on museum lighting, we outlined the main points to consider when first looking at lighting an art exhibition. We focused on creating an enthralling visitor experience.
This time, we’re getting into the details, in more ways than one, as we look at lighting small artefacts displayed in showcases, cabinets and the like.
The aim of lighting is to enhance these elements, to bring out their details and colours, and accentuate their value in the eyes of the beholder. These same requirements can also apply to the world of retail, in boutiques and jewellery stores, for example.
The lighting possibilities are manifold although, on closer inspection, they depend on decisions taken upstream.
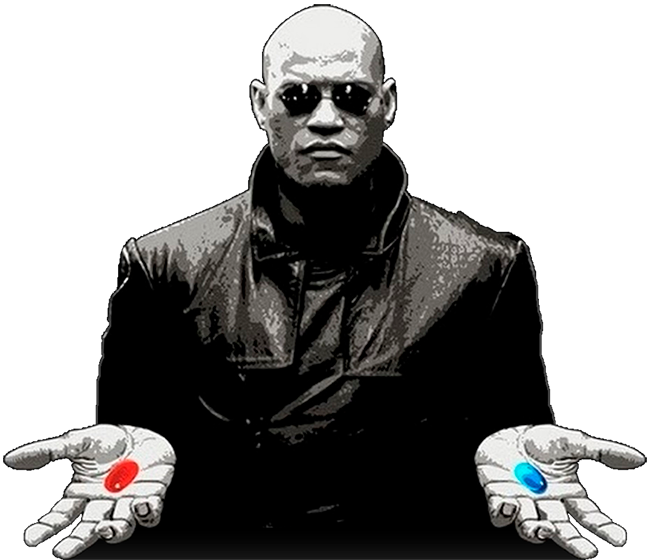
Red pill or blue pill. Recessed or surface-mounted light
It all starts with an examination of the structure in which we want to install the light point, or points.
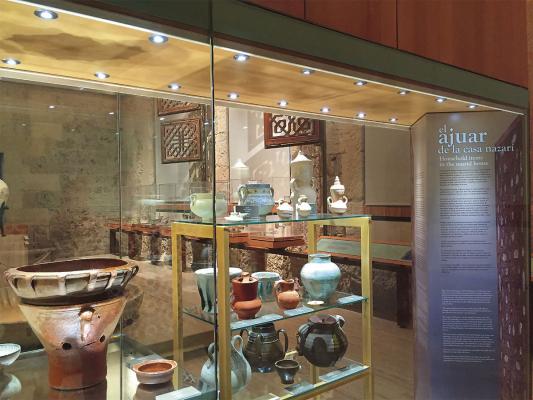
🔴 In the showcase in the first photo below, the thickness of the top of the case is sufficient to install recessed fixtures, taking into account not only the latter’s size, but also the space needed to dissipate the heat produced by their operation.
🔵 The second photo, on the other hand, shows a display cabinet made of glass surfaces, with no thicknesses or shelves suitable for recessed installation. Instead, four projectors have been used, mounted on arms of the right length to fit inside.
So whether a lighting fixture can be recessed or surface mounted depends on the type of space that holds the object or objects on display.
Eyes 3.0, 4000K, 1W, 20°, satin Go to the project and credits 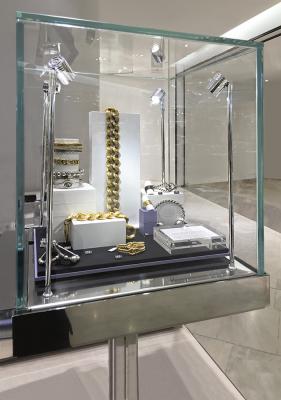
Wall 7.0, 3000K, 2W, 40°, chrome, customized heights Go to the project and credits
Our first question arises from this structural constraint: recessed or projector? Red pill or blue pill?
Don’t worry, the game doesn’t end here: both projectors and recessed fixtures bring with them other questions, and other choices, determined by their technical and lighting characteristics. We propose here to take first one pill and then the other to discover the potential of each scenario. Let’s find out together “how deep the rabbit hole goes”. 🙂
Blue pill. Lighting with a projector
The small glass cabinet you see above required one or more very compact projectors to be installed within it.
We now have to work through the possibilities offered by these fixtures, such as a moveable head, and different mounting options depending on how we want to position their light output.
It’s best to start from the object, or objects, we want to highlight.
Light composition
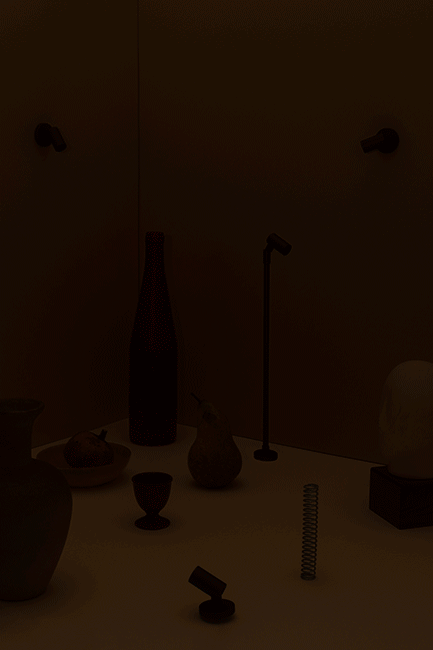
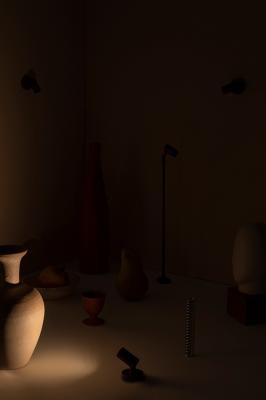
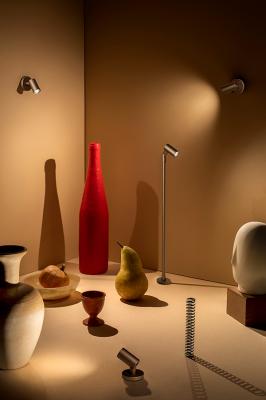
Picture a composition of assorted objects arranged on a horizontal plane enclosed between two vertical walls, a setting in which each element has a precise position.
The experience the exhibition offers visitors is one of discovery: from each single detail to the sum of the parts, in a succession of lighting scenes that make up the final work.
Each lighting choice is intended to emphasise the three-dimensionality of the individual shapes and play with shadows; in combination, the scenes should create a harmonious vision of the whole.
As we already saw in the previous article, the audience’s attention can be guided towards certain details in the scene in stages, by controlling the lighting programming with the Casambi app.
Let’s take things slowly and look at each individual element: the light comes from different points and enhances the objects on display in different ways.
🔸 The amphora in the foreground on the left is illuminated from the front and below to dramatic effect.
🔸 A point of light coming from the left-hand wall illuminates the scene from above, emphasising the bottle and the objects in the centre (plate, pear and glass): the final effect is one of solids and shadows.
🔸 The red bottle is given three-dimensionality by the combined action of two light beams coming from the vertical walls. The right-hand one creates the silhouette on the left-hand wall, as well as providing indirect lighting for the entire scene.
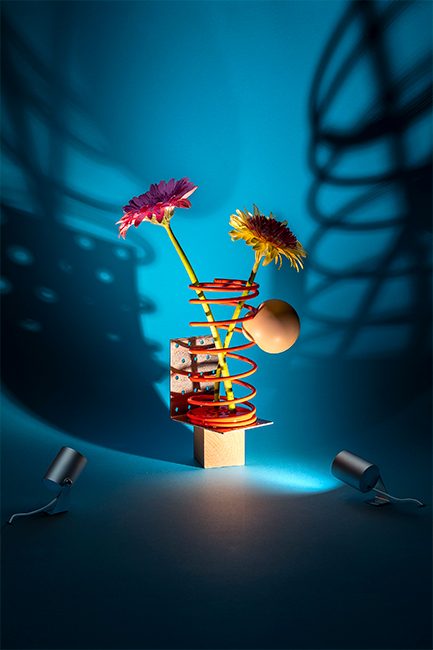
🔸 To illuminate the statue and the spring, that is, the objects to the far right of the scene, there is a light point mounted right inside the latter. The arm that supports the fixture raises its beam above the elements on display. The dramatic effect achieved with the amphora is repeated here with deliberate symmetry.

🔌 💡 🔌
All our families of compact fixtures suitable for these displays
have a current supply that allows the output to be modulated
by fixing it at a certain value according to
the illumination requirements of the installation.
The value indicated in the technical data is the maximum current for the fixture,
but this can be adjusted for a lower output.
That is why we specify ‘max’ in front of the power supply figure (e.g. max. 350mA).
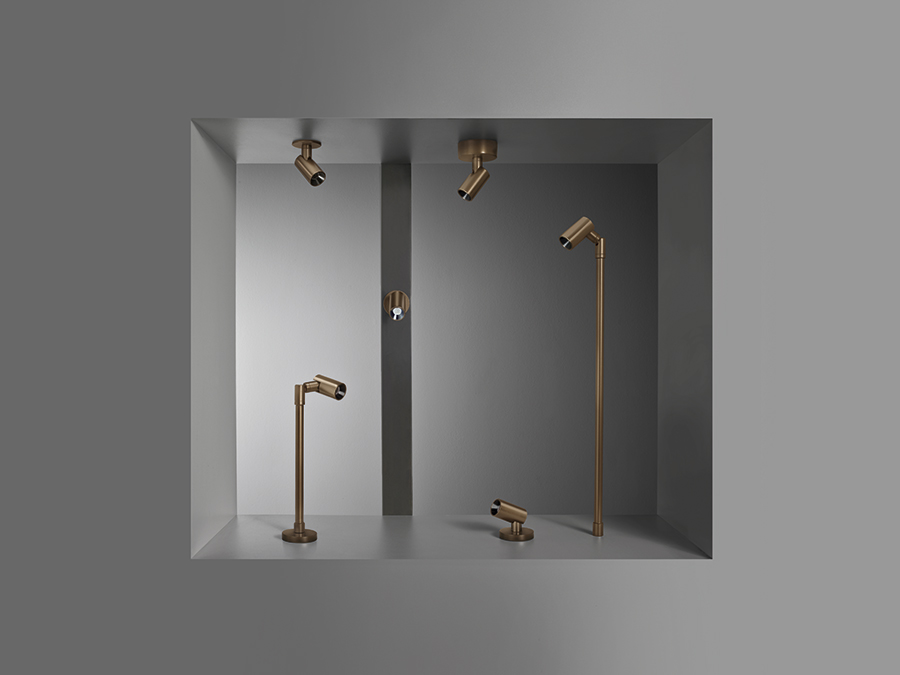
Toolbox: “all options” light
For our display, we used a single type of projector with multiple installation accessories that give it versatility (mounting on a wall or a horizontal surface, raised on an arm), and this allowed us to angle its light output exactly as we wanted.
Let’s take a closer look at the available accessories:
🔧 Three types of plate for ceiling, wall or floor installation: the magnetic plate, as the name suggests, is perfect for quick and easy mounting on metal surfaces (in the photo below, we can see it mounted on the bar in the centre of the composition); the ceiling rose (in the top right of the photo) makes wiring easy, and the cable doesn’t need to run inside the thickness of the structure, unlike the fixing base, which nevertheless offers the advantage of a less intrusive appearance (in the photo it is installed on the two projectors at the bottom);
🔧 The fixing spring (top left in the photo) needs to be installed on a panel, generally made of MDF or plasterboard, thick enough for the fastening;
🔧 The nipple coupler, ideal for ultra-minimalist installation without a visible base. It can also be used with the arm – in the photo below it is the option shown furthest to the right.
🔧 The arms, in two different sizes – 150 mm and 300 mm – allow the light source to rise above the objects to be lit.
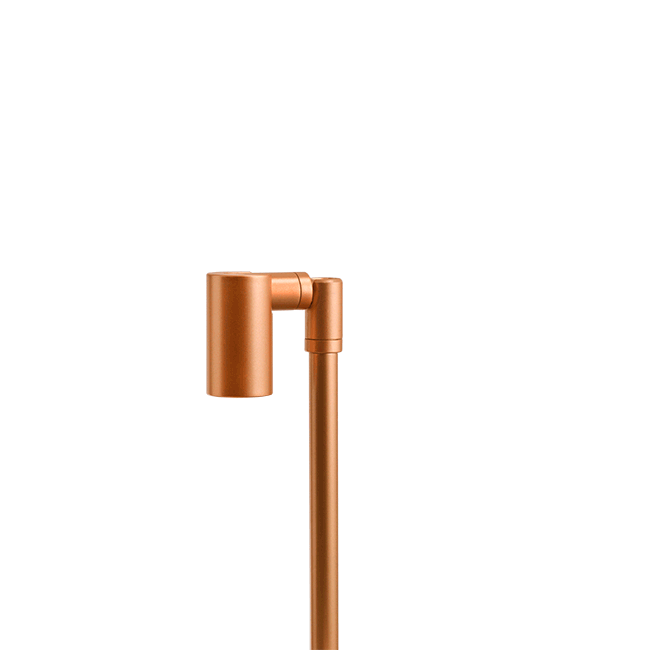
Krill 2.4, antique bronze Find out more about Krill
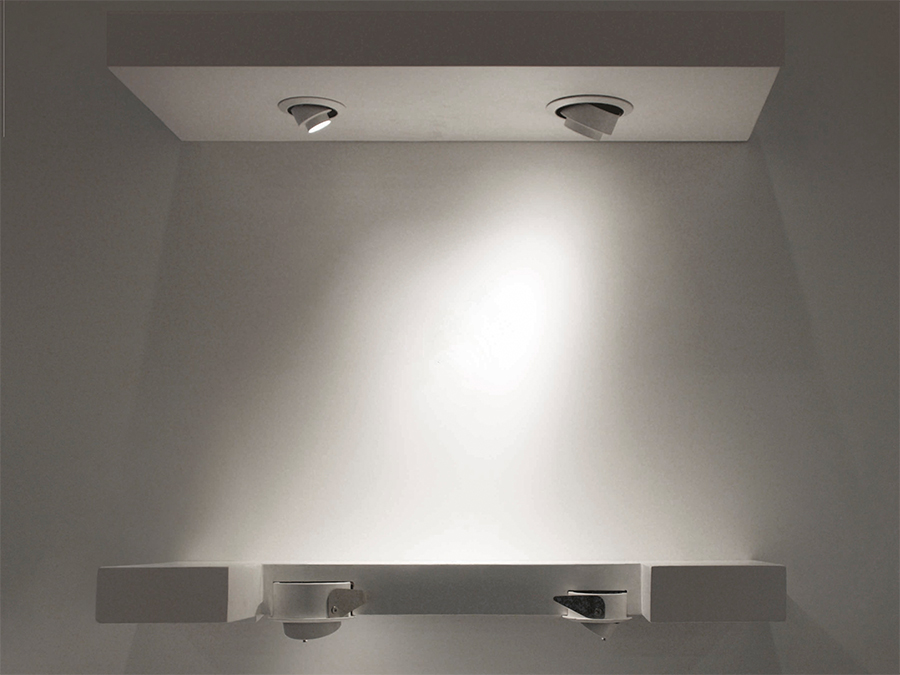
The projector heads are of course adjustable; in addition to this movement, the arm’s double joint allows a rotation of up to 180°:
Light without limits
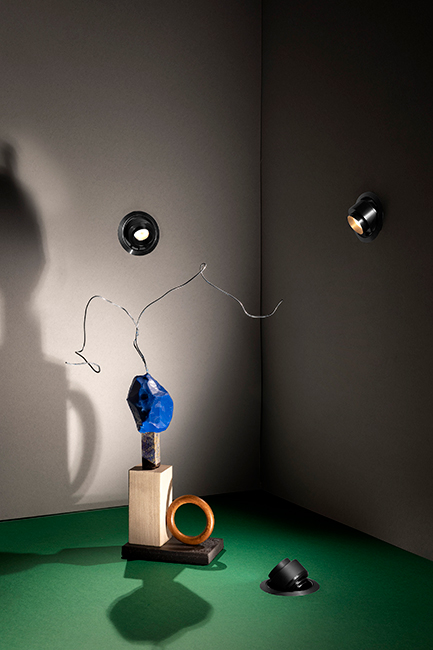
Let us now consider an art installation where it is not only the nature and arrangement of the artefacts that matters, but also the scene in which they are placed. There may be, for instance, a surface that acts as a backdrop for the objects, but no side wall on which to fix the projector. This limit forms the creative space within which the light needs to act.
The work is lit with an accent light from below and two projectors placed semi-laterally and symmetrically.
This enthralling theatrical effect is created by aiming the lamps towards the backdrop, where shadows redraw the objects in a play of magnification and deformation that enhances the artwork’s expressive possibilities.
All we have to do to achieve the desired dramatic effect is put the projector head’s adjustability to use.
Light for all sizes
What happens when the objects on display in a showcase are not only positioned in different places, but are also very different sizes? We can’t necessarily light them using a single type of fixture.
Look at the three cacti below: to highlight the three shapes, we chose three projectors of gradually increasing size and power, following the size of the plants in their pots.
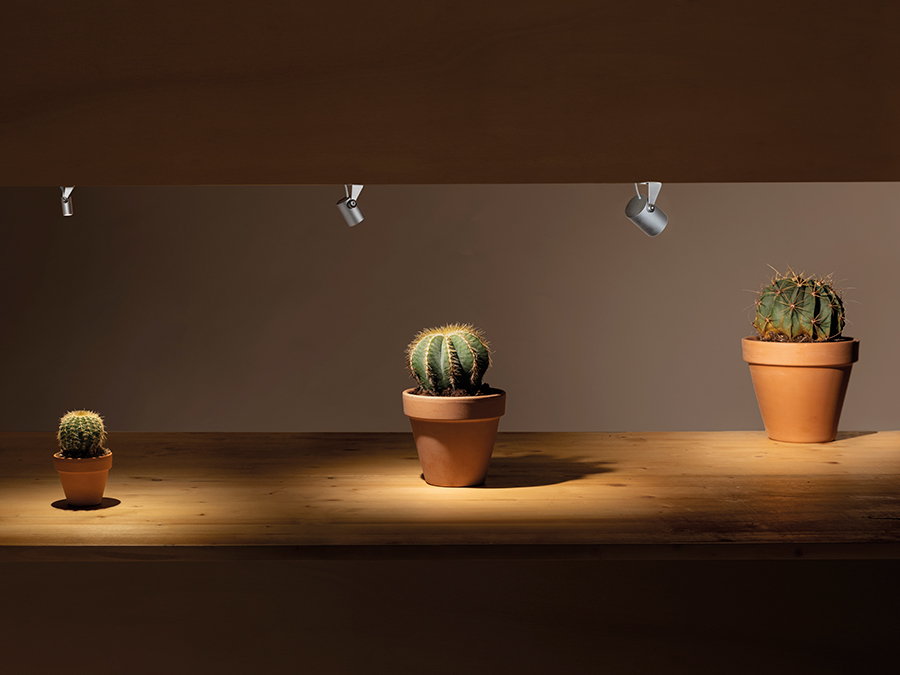
Gem Mini 1 / Gem 1.1 / Gem 2.1, 3000K, 1W - 2.5W - 4.5W, 48° - 42°, pearl chrome Find out more about Gem
In this situation, we look for a line of indoor projectors with a range of sizes and wattages so that we can select the most appropriate fixture based on the size of each object to be lit. In any case, we only consider compact products that don’t risk being too intrusive.
Red pill. Lighting with a recessed fixture
And what if we had taken the red pill from Morpheus’s hands? We would find ourselves in the scenario of recessed fixtures. We would have assessed that the structure not only allows for the lamp body to be inserted, but also offers enough room for the heat produced during its operation to be dissipated.
Let us therefore explore the possibilities offered by this category of products, which can be discreetly installed so that they are less visible and more integrated into the context.
The lighting fixtures we are thinking of have a truly minimal height (22 mm), designed specifically for use in display cases, showcases and niches with very shallow thicknesses. The shelf below is an example of this:
Ciak 1.6 / Ciak 2.6 / Ciak 1.7 / Ciak 2.7, 3000K, 2,5W - 5W, 29° - 32° - 17° - 13°x43°, white Find out more about Ciak
Light all around
Another display: three different materials, shapes and colours, combined to create a composition with a sculptural, almost dynamic appearance.
To enhance the roundness and three-dimensionality, the light needs to come from more than one angle.
We select three different light points and ensure the light is directed exactly where we want it by adjusting the optical body.
Like the sculpture to be lit, ourlighting fixtures can move through all three dimensions, and this opens up all sorts of orientation possibilities.
Toolbox: adjustable light
Let’s take a closer look at the range of movement of a recessed fixture: we can pull the optical body out of its housing and move it from the 0° position to a tilt of 70°, and all points in between; at the same time we can also rotate it on itself by up to 350°.
These two characteristics mean we can overcome the limitations imposed by the choice of installing a recessed fixture in a fixed and immovable point of the cabinet. By tilting and rotating the fixture, we can aim the beam correctly and direct it to where the object is placed.
In all this wide range of movement, the fixture’s light source risks dazzling the observer. In this case, an anti-glare snoot built into the fixture can prevent the light beam from meeting people’s eyes directly. This option should be considered in every case, given that compact recessed fixtures for lighting showcases and display cabinets are quite literally in the public eye as visitors approach closely to study the small objects on display.
A single light
We’ve introduced adjustable recessed fixtures with an art installation that required three light sources, but let’s assume that only one recessed fixture is available. Rather than creating a central cone of light, we can move the object, like the fossil in the first photo, and tilt the recessed fixture to one side for a more vibrant, less flat effect. A recessed fixture mounted in the base, as in the second photo, with the vase on display very close to it, will produce a dramatic effect.
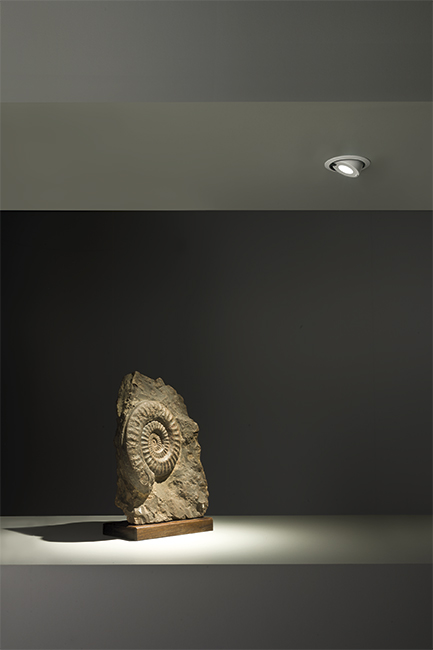
Ciak 2.7, 3000K, 17°, white
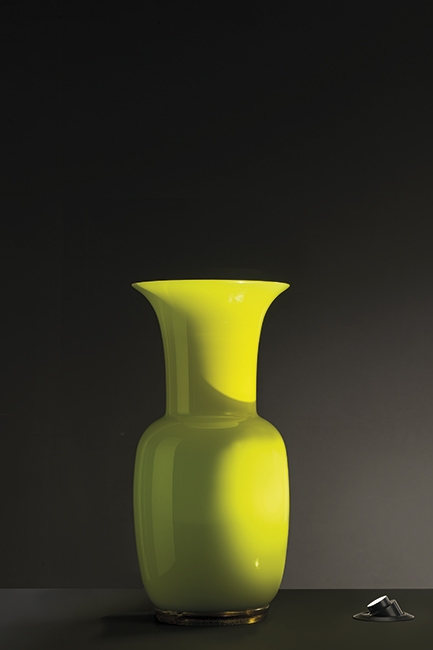
Ciak 1.6, 3000K, 52°, black
Calibrated light
The final scenario we want to look at here involves a characteristic of both art exhibitions and retail situations: transience. One object has taken the place of another, with a totally different shape, or a single item has replaced a larger group of objects. What do you do?
We were saying earlier that an adjustable recessed fixture makes us breathe a sigh of relief because we can direct its light output so that it hits the object, as is the case with the vase of tulips below.
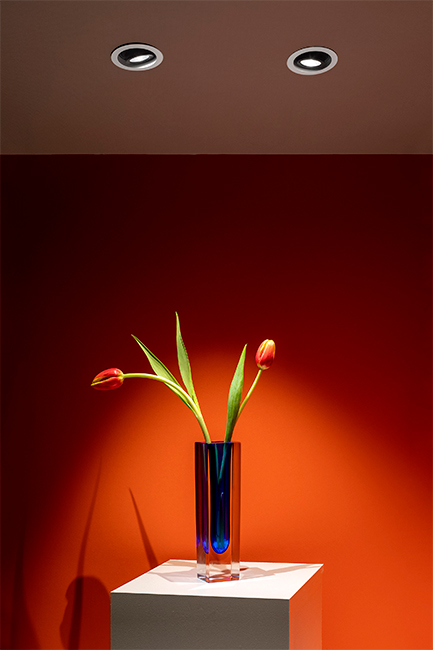
Not only that, but the recessed fixtures in the photo have another useful feature: the zoom lens, which we used to calibrate the width of the beam to achieve exactly the desired effect.
If the tulips are followed by a much shorter floral arrangement, we’ll use the zoom lens again to frame the new shape with light. Let’s see how the zoom lens works in our final toolbox.
Toolbox: zoom in and zoom out
The zoom lens allows us to adjust the angle of the light output to suit the scene we intend to illuminate. In the video clip below, as the number of the famous bottles designed by Fortunato Depero increases, the optics in the recessed fixture change from narrow to ever wider to accommodate all the bottles.
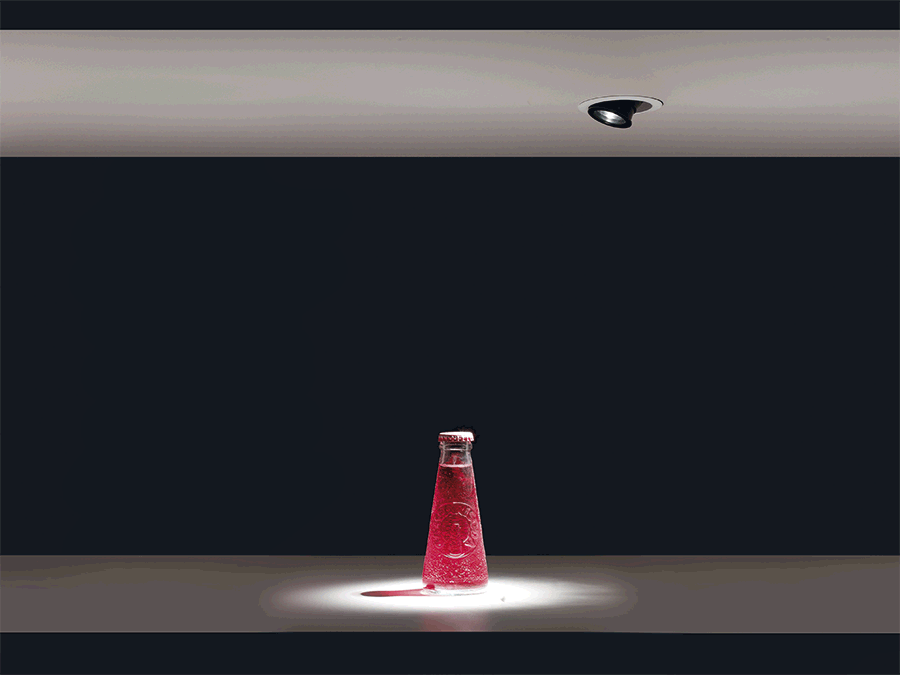
Cameo 2.8, 3000K, tiltable zoom lens 8°—58°, white
The Campari red was not chosen at random but to show a special feature of lighting fixtures designed for museum and art lighting: LED light sources with high colour rendering (CRI>90). High colour rendering is an intrinsic characteristic of the lighting used for both art and retail: it is what reveals the vibrant colours of the work of art or article on display with the greatest fidelity.
🎨 💡 🎨
On the subject of colours, the fixtures intended for display cabinets and showcases
must meet the aesthetic requirements of the context in which they are used.
This is why, in addition to finishes that go with everything, such as white and black,
for the museum, art and retail sectors we also offer antique bronze and rose gold.
Red pill and blue pill: combined light
We started with an either/or choice, recessed or projector, to explore different lighting scenarios that allowed us to illustrate the technical potential of compact lighting fixtures for exhibitions and displays.
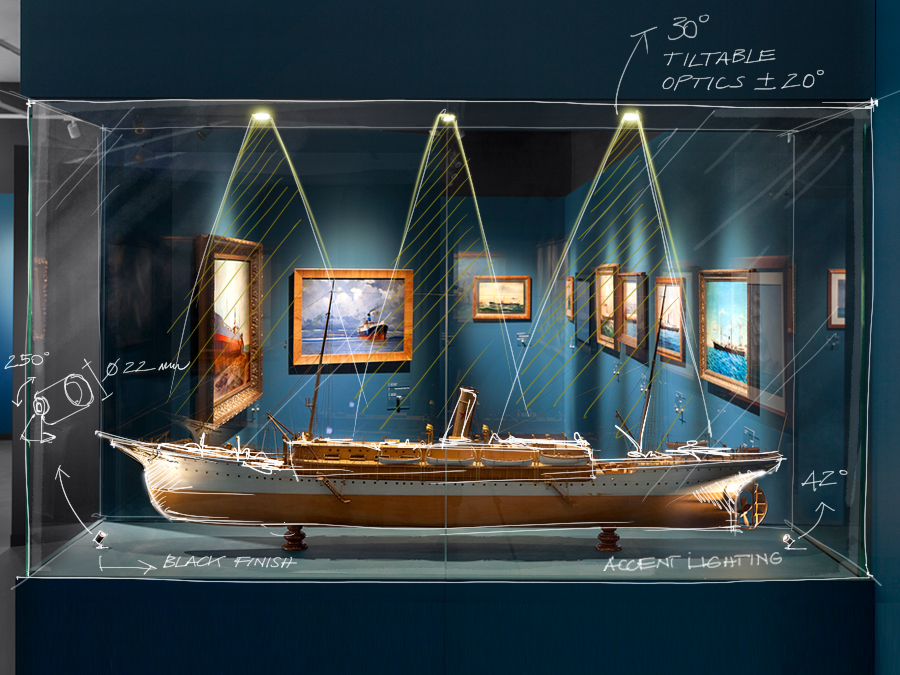
A final possibility we would like to put to you is the coexistence of these two types of fixtures inside display cabinets and showcases, such as the one that houses a model ship in the Coeclerici Gallery in Genoa’s Galata Maritime Museum.
The two projectors are positioned at the bottom, at the two extremes of the object, to highlight the ship’s stern and the bow with an accent light. Meanwhile, the adjustable recessed fixtures, installed in the top of the structure, illuminate the artefact along its length.
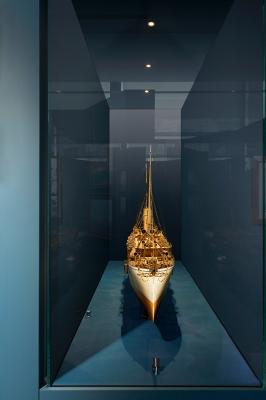
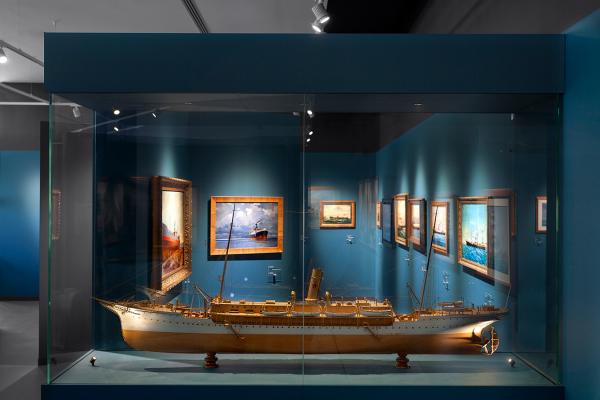

This example confirms what we were saying at the start: context and space guide our choices when it comes to light. Far from constraining us, these spatial limitations can stimulate our creativity and allow us to amplify the expressive and emotional power of the work to be lit.
Have you used a different way to illuminate small works of art?